Quantcast
Channel: String Theory Crochet
Viewing all 226 articles
Browse latest View live

Free Crochet Coaster Pattern.

$
0
0
I have had a lovely week. Ben and Danny came to stay over night and as usual we went out for breakfast at Tesco  not as romantic as Tiffany's but a wide choice and very reasonably priced. It meant that everybody could eat what they liked -pancakes with maple syrup, cocoa pops, a full English breakfast and a toasted tea cake. This is four breakfasts you understand not all for one person!!
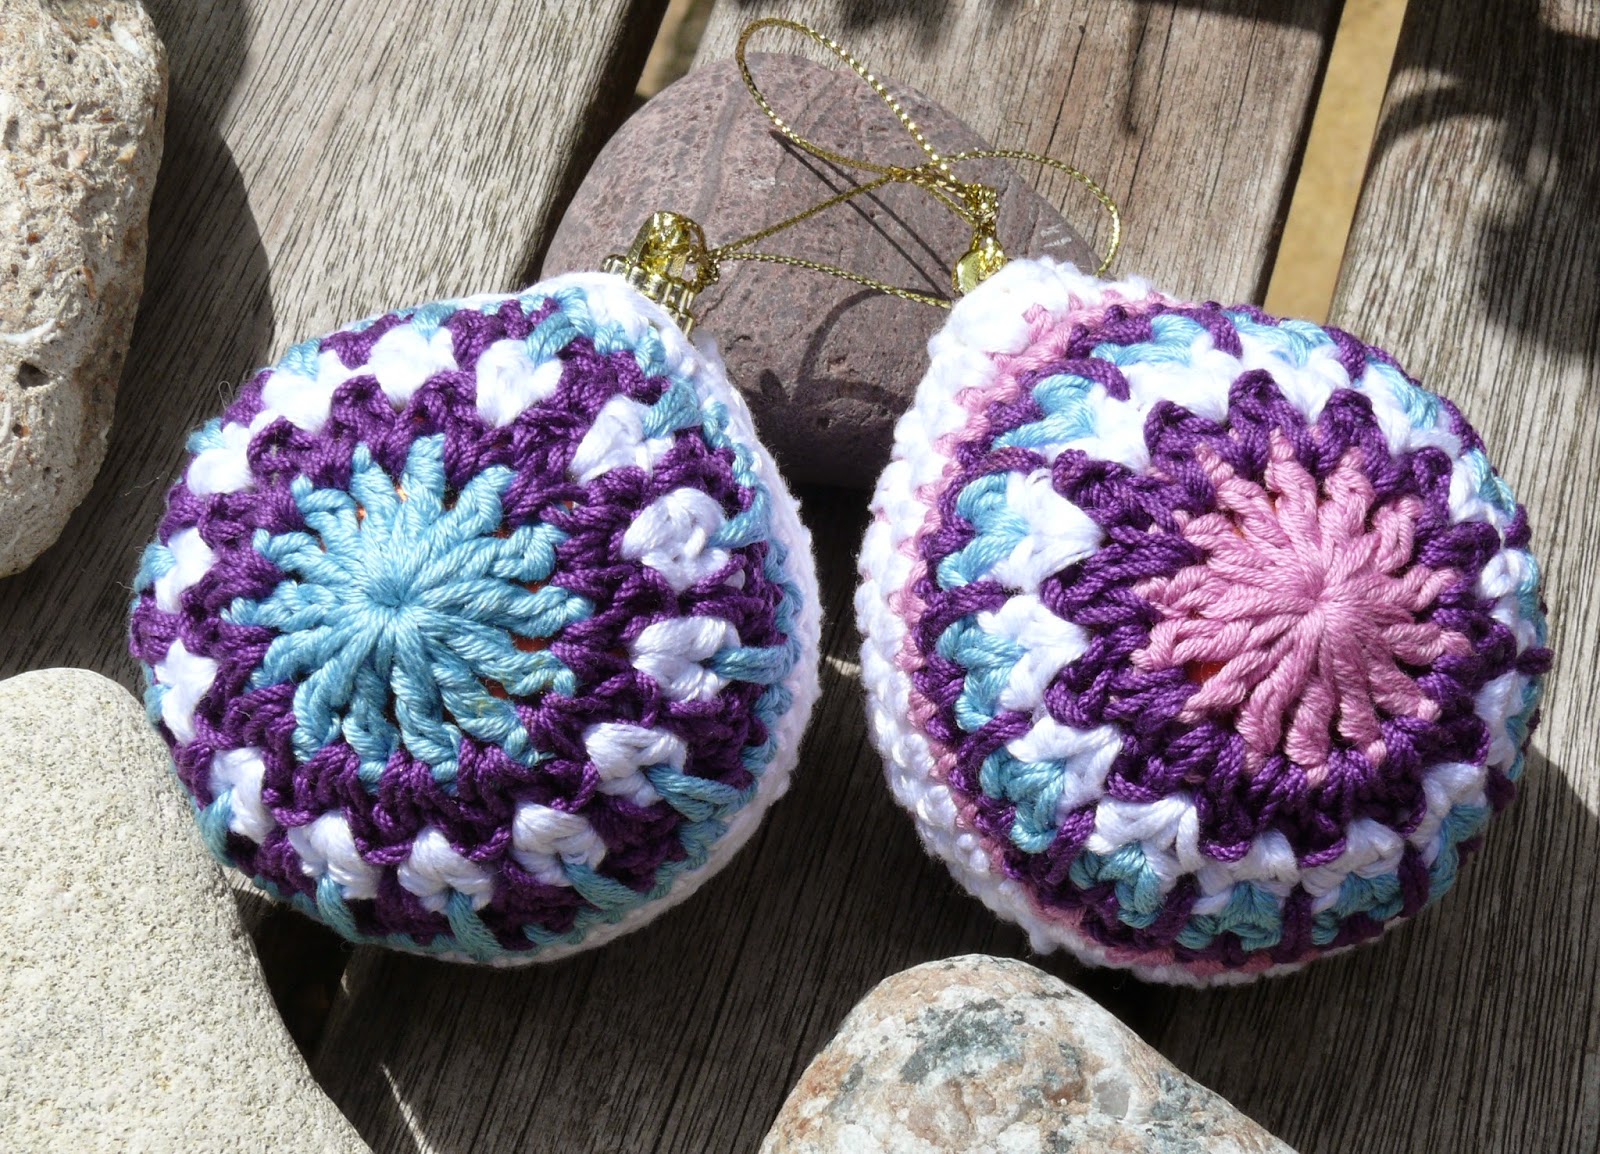
Anyway not as much time as usual for crocheting so here is a pattern for you to try, according to a seller on ebay these are Bohemian colours but the instructions have other colours in the pictures.


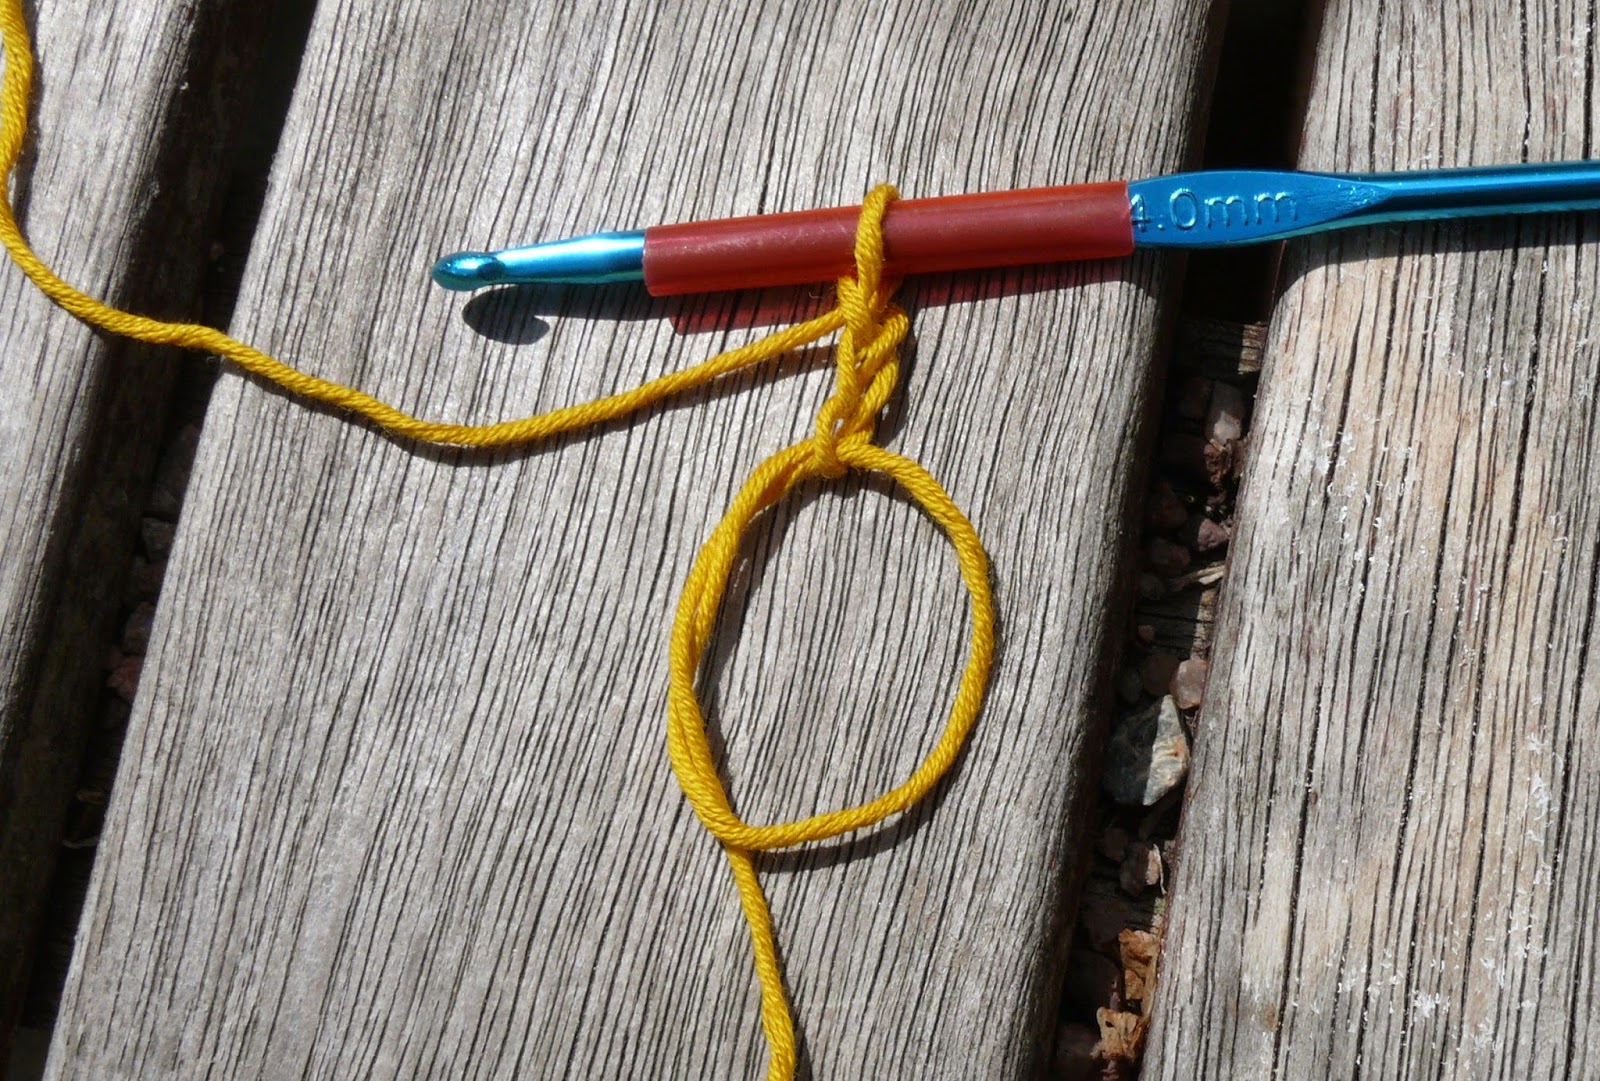
For this project I used a 3.5mm hook and dk cotton yarn. All written in English notation.

1. Magic circle ch 2(counts as the first htr) 11 htr in the ring join with a ss to top of two chain. and fasten off.
2. join a new colour between two of the previous rows half trebles. 3 ch, then (1htr in next gap between half trebles 1ch) all the way round join with a ss to second of the three ch and fasten off.
3. Join another colour in a 1ch space, 2ch and lhtr in the same space 1ch ( 2htr in the next 1chain space 1ch) all the way round join with a ss to top of starting 2ch and fasten off.
4. Join a new colour between two half treble (not in the one chain space) and repeat row 3 but work 2ch between each pair of htr.

 5. Working in the row below put hook in a 1ch space and work 2ch  stretching the first chain to enclose the normal row with the yarn (second picture) in the same space work 1htr then 2ch ( in the next 1ch space of the row below work 2 htr and then 2ch) repeat this all the way round. join with a ss to the top of the starting 2ch.


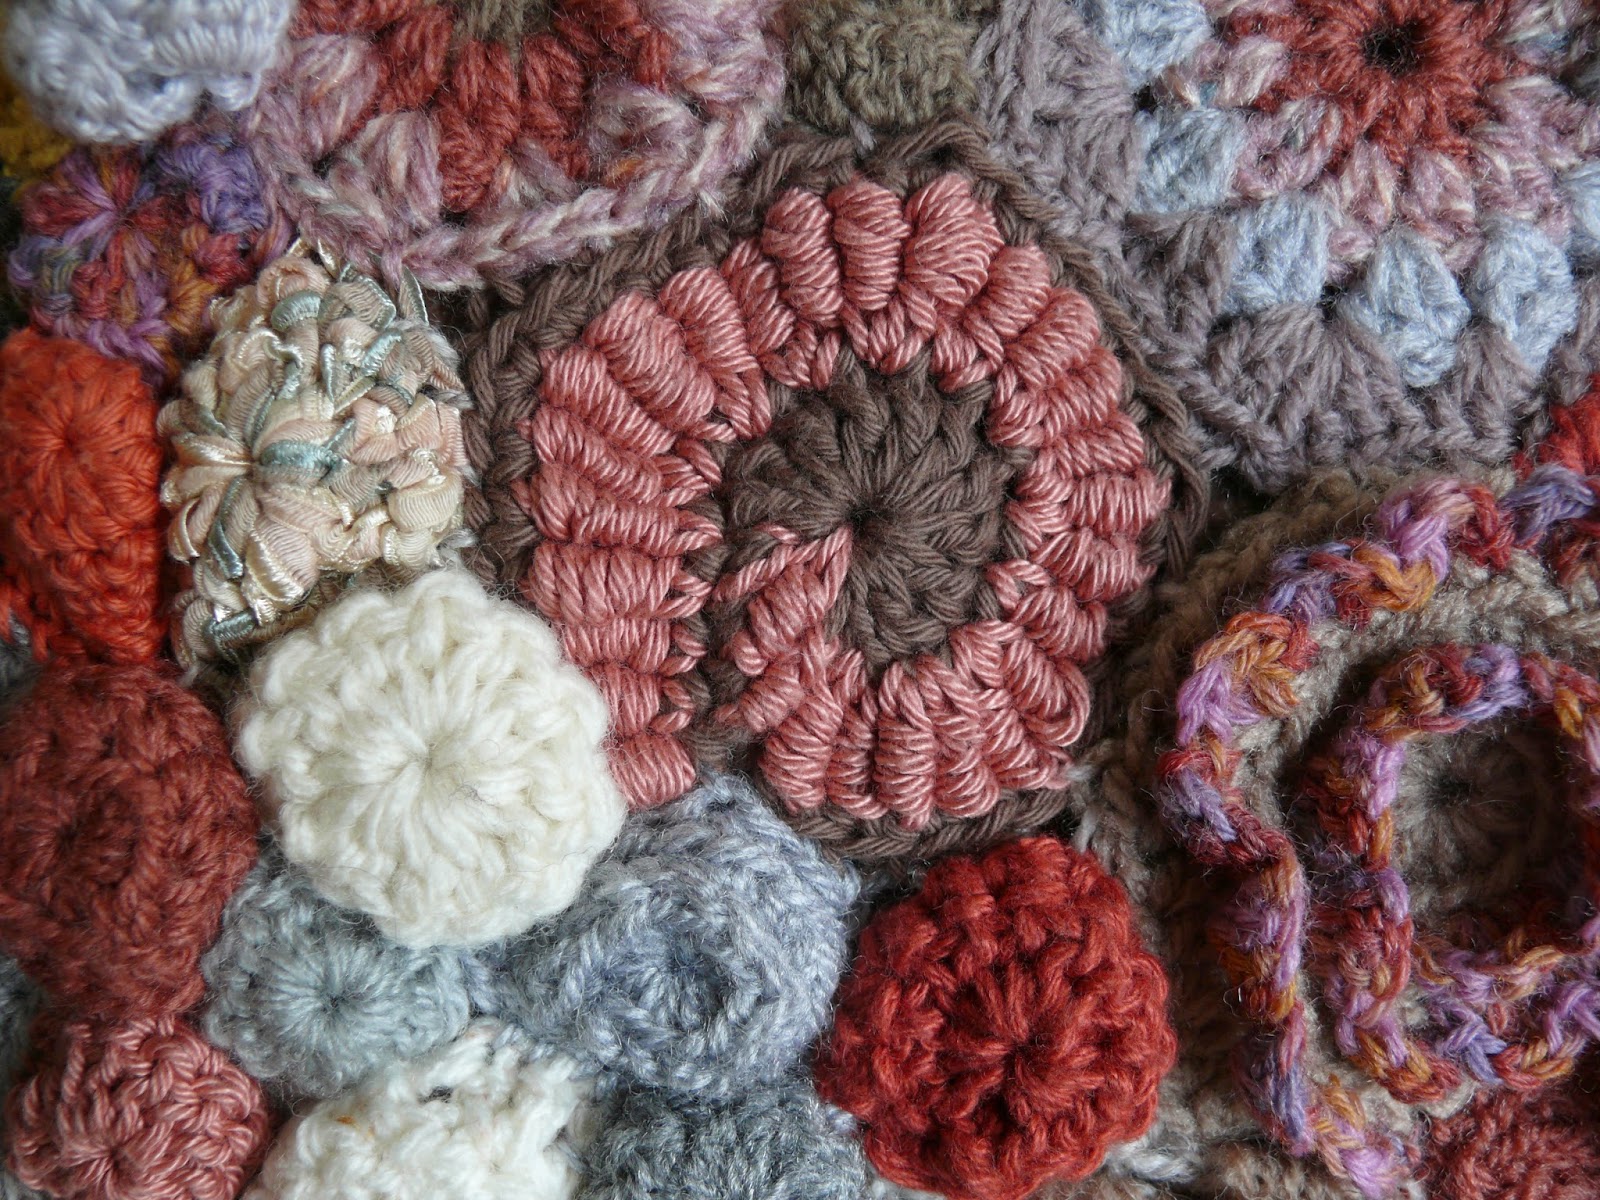
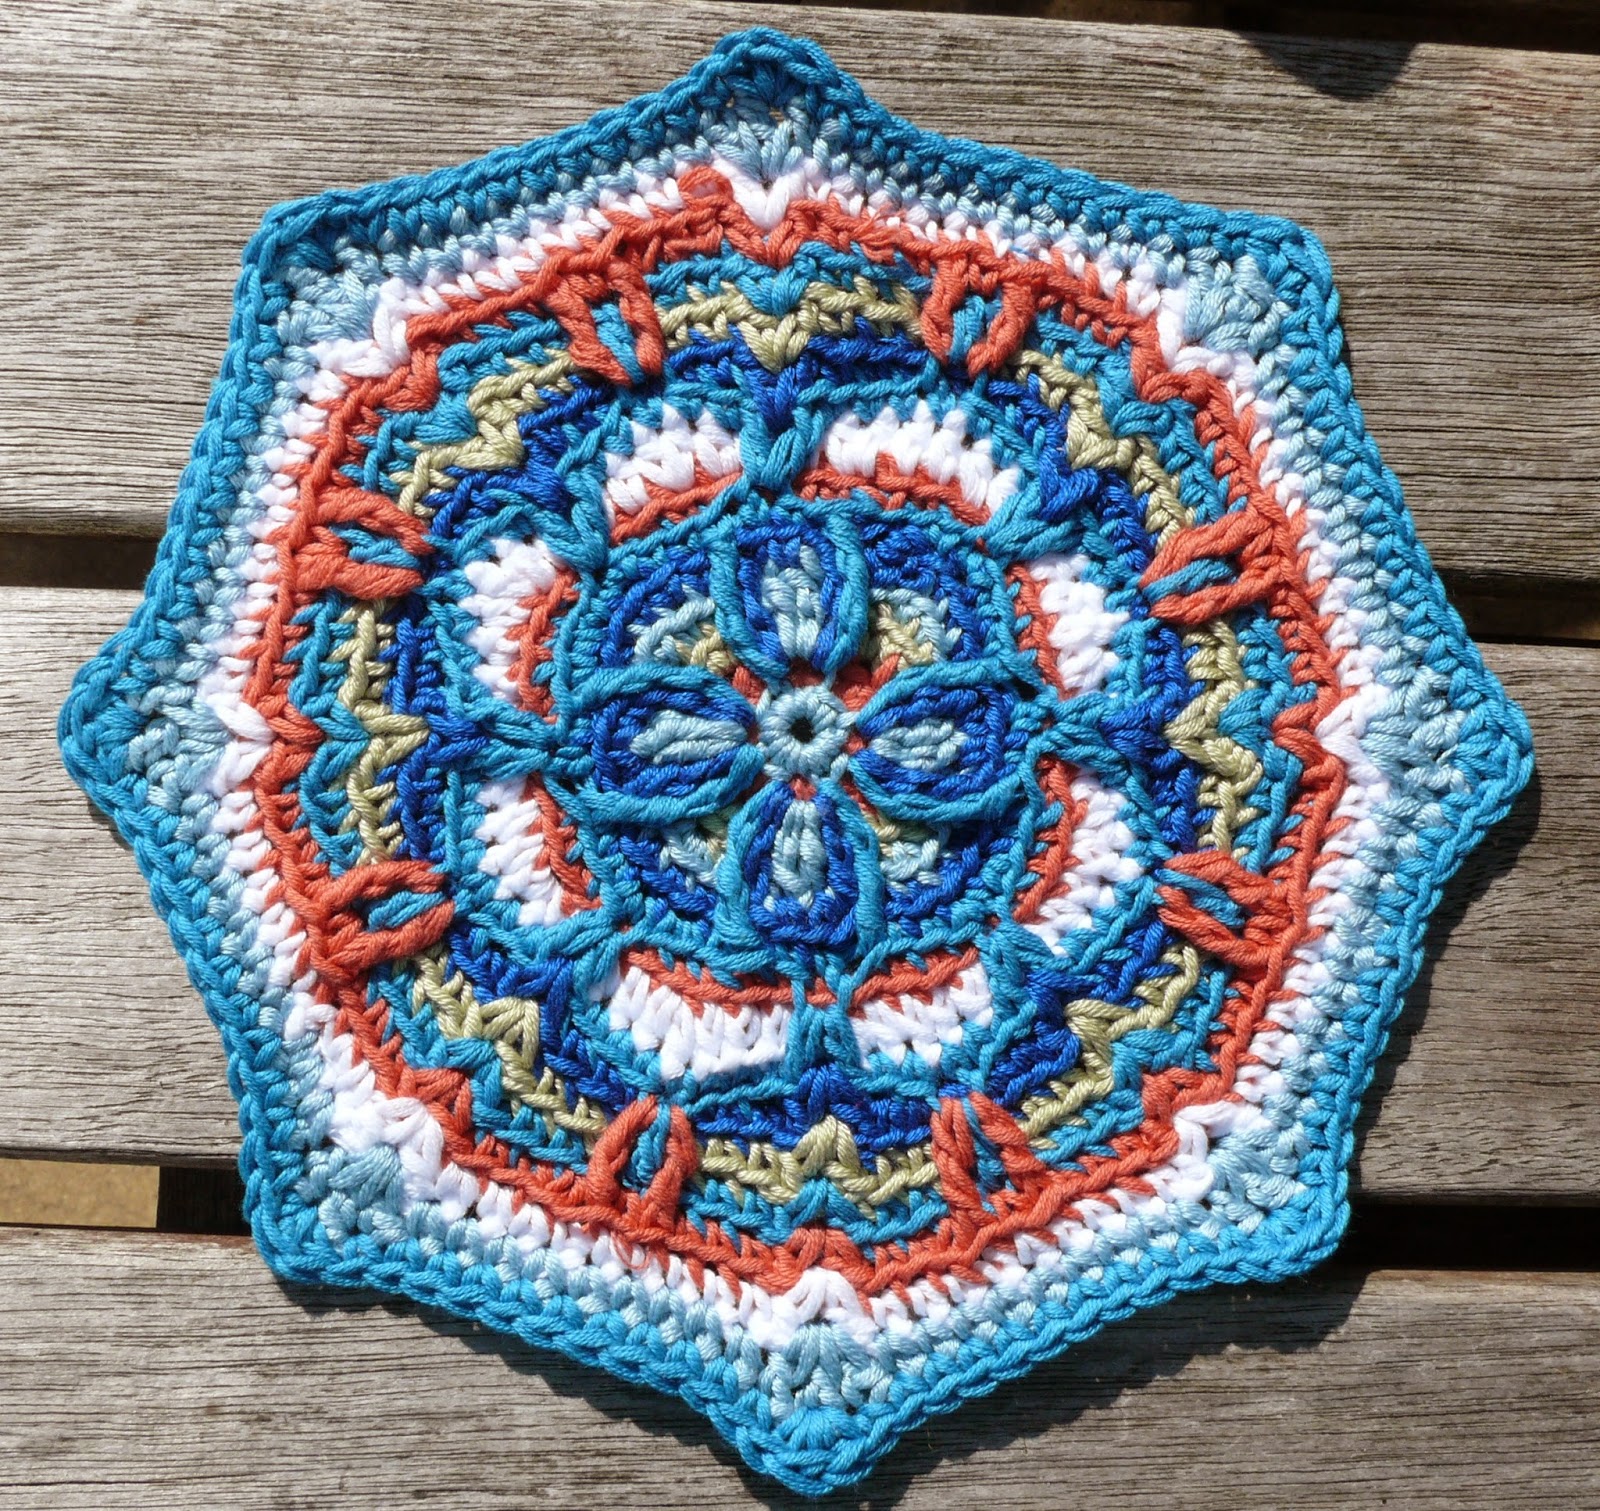
6. Join the yarn between a pair of htr ( not the two chain space ) work 1ch 3dc  then work a treble between two htr of the row below. ( 4dc between two htr of the current row and then 1tr between two htr of the row below) repeat this all the way round join with a ss to the starting dc and fasten off.

The start of the four dc cluster between a pair of htr.
Working a treble in two half trebles of the row below.


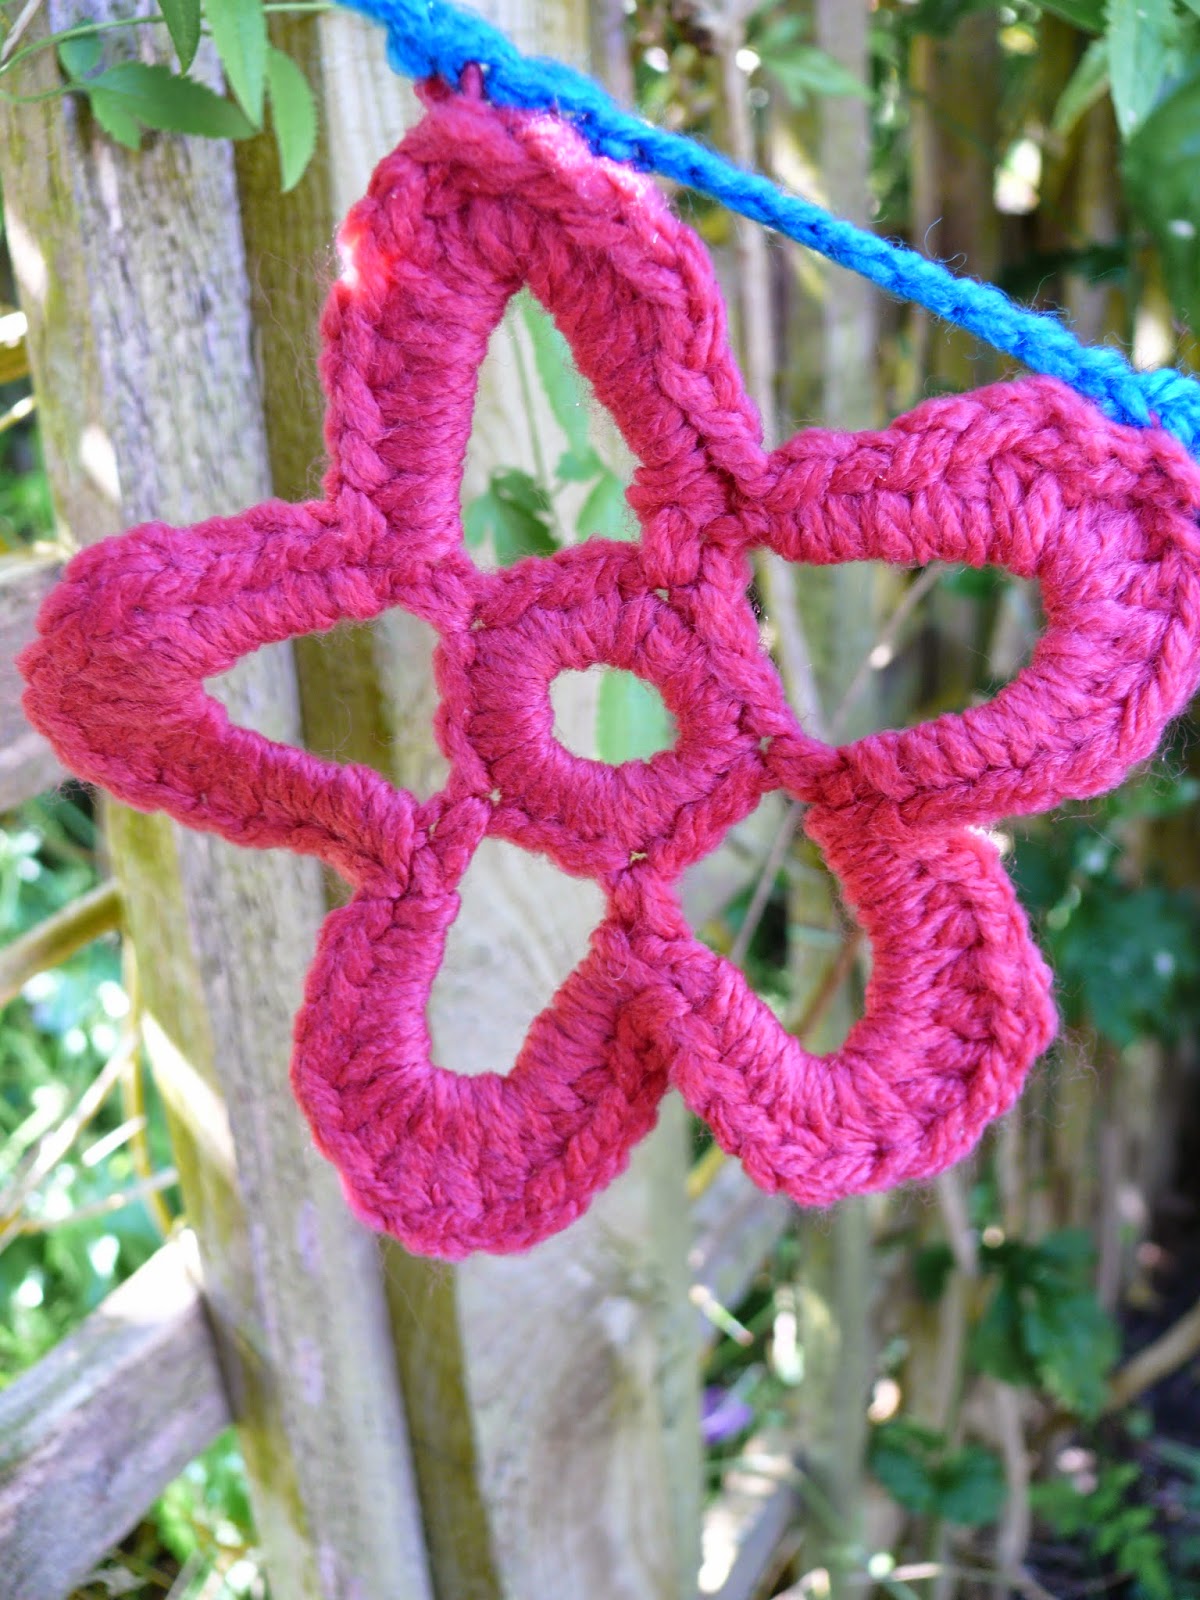
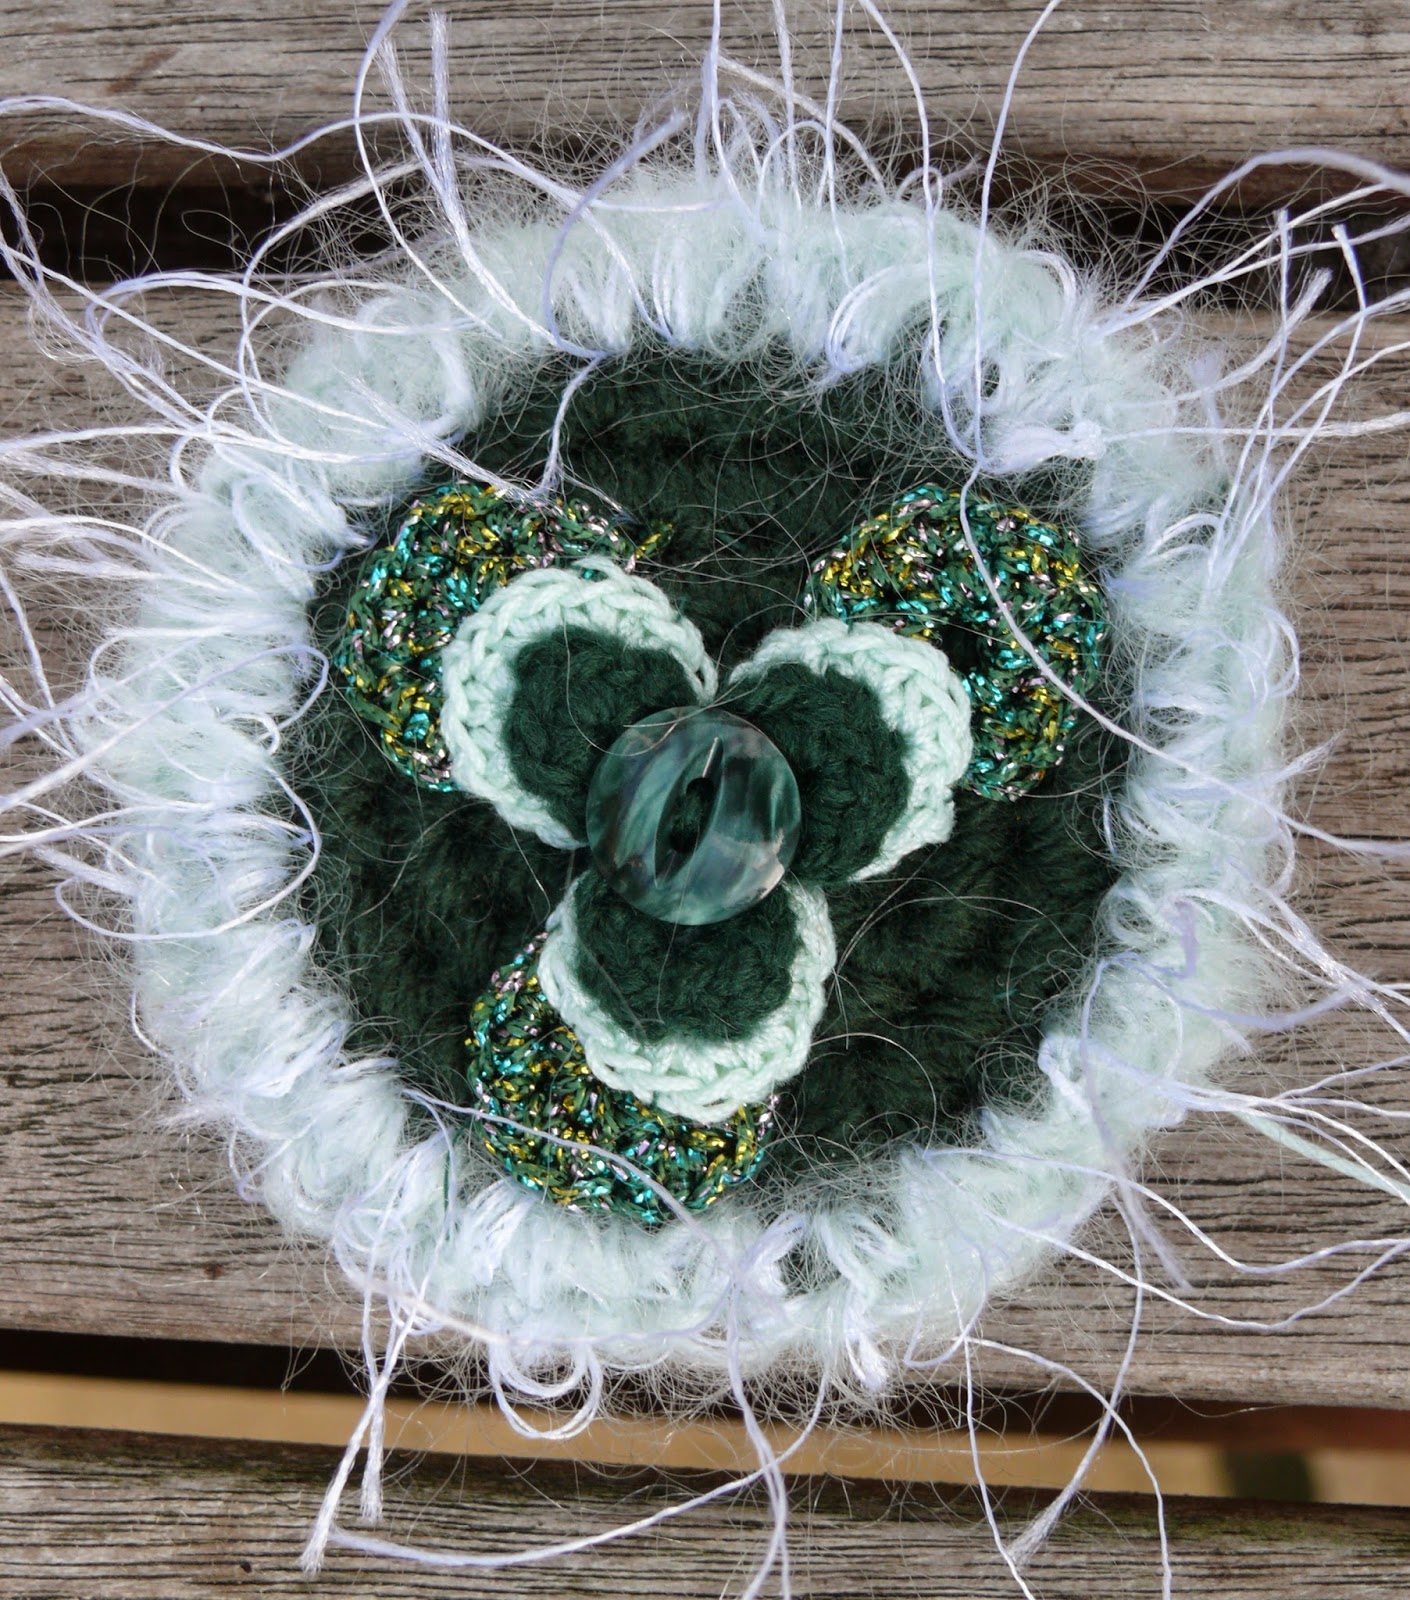
You could stop at the end of row 6, as the clusters of 4dc and the long treble give a nice scalloped edge -like this

7 Join a new colour into any stitch 1ch and then work a row of dc all the way round - cut yarn and pull  through current stitch and then needle join to the first ch to make a neat edge.

Please let me know if there are any errors and please get in touch if I can help in any way.

I may not do much crocheting today as the sun is shining. which seems to be a rare occurrence so I am off outside to make the most of it.
Lynn

Crochet hats, some buttons and beads and CE marking.

$
0
0
Apart from the usual things there are three things in my head: The Hurst Show which is two days long and I am not sure we have enough stock. The Fibre East Show which is a new venture for us and we are making supplies and patterns for crafters. The other thing is CE marking our toys or we cannot sell them at Hurst which means we will have even less stock. So far we have read millions of gobbledy gook lawyer speak documents and looked at about the same number of blogs - there is a great deal of angst out there. The conformance kit does make it easier to understand get in touch if you want more details about this.

On to lighter matters:
First replenishing stock for Hurst which is our next fair. Last time we went it was very hot so I thought cotton sun hats were a good idea?     So this time it will probably be freezing - no problem we have some crochet blankets!


Then I noticed that hair bands were selling well on line so ..........

 Crochet has enough stretch in it to make these suitable for most heads. I should say the ones on line have  flower which is plastic and bigger than a childs head. These are in much better taste. This is crochet for when there is something really gripping on the telly - very easy and requires no mind.


Supplies for Fibre East:

These become these packets for free form knitting or crochet.


The buttons are 25g and the beads are 20g. It is surprisingly time consuming, especially since we am trying to include a variety of colours, textures and sizes in each pack. I was really pleased to come across some smaller packets of mixed beads today on sale for £3.99 ours won't be so expensive!

And finally CE marking:
Our first piece of apparatus:


This will form a vital part of the tension test which must be performed on all toys. There are so many tests to perform that I am going to make a creature that contains all of the materials that we use in making our toys and I am going to perform all of the tests on it. I will share it when it is finished but what I am wondering is should I do the wash test before the flammability test because I think a wet creature should pass the flammability test with flying colours!
Seriously though we are happy to share any ideas and data because we think it would be very sad if all those unique, beautiful and quirky toys that our fellow crafters make, should disappear.
Lynn
                                                                                                                           

Summer Flowers in Your Hair? Free Crochet Daisy Chain Pattern.

$
0
0
Vicky is changing the face book photograph practically every day in order to show all the things we can and have made. The hippy flowers for your hair seems to have hit the right note for the summer. Of course they can also be appliqued to things and tied round your summer hat. Anyway here is the pattern if you would like to try it.

The pattern is in UK terminology.  If you use US notation and would like to know how to 'translate' there is a really good chart on this page that should make it all clear:  http://crochet.about.com/od/conversioncharts/a/termtranslate.htm

Daisy Chains

You will need scraps of 4 ply yarn - I used cotton because it seemed in keeping with the hippy theme. For some flowers I used a 1cm diameter roman blind ring in the centre but this is not strictly necessary a magic circle will do. I also used a 3.00mm hook.
Flowers make 5
 Flower centre: For traditional daisies use a mustard yellow colour:
Either make a magic circle, ch1(does not count as a stitch) and then work 12 dc into the circle, join with a ss and fasten off
Or do the same with the plastic ring instead of the magic circle.            
 Petals: join the yarn you are going to use for the petals (white for a traditional daisy) to any of the dc of the flower centre.( 6ch, ss in the next dc.) repeat this all the way round until you run out of dc. Fasten off and weave in ends.This will give you approximately 12 petals. a few more or less won't matter.
 Leaves and Chain: Made in one piece.
1. 70ch, turn ss in second chain from the hook, then working along the chain dc,htr,2tr,htr,dc, ss. (one leaf complete.)
2. ch9 turn and repeat number 1 along this chain.
3. ss in the chain next to the base of the first leaf.
4. 25ch turn and repeat 1 and 2 to make a second pair of leaves.
5. Continue in this way until you have 6 pairs of leaves. Then 60 chain and fasten off.

 To make up: tie knots in the ends of the chain and cut off yarn ends.
Stitch the flowers between the rings - you have to bend the chain round the edge of the ring as you sew or you will see the chain through the middle of the daisy.

Note if you want just one leaf on its own just leave out 2 and 3.
In the brick coloured chain I have sewn the daisies on top of the pairs of leaves.

Obviously you can make the chain as long as you like by increasing the number of daisies and the number of pairs of leaves.

You can also leave out the long chain at the start and finish if you don't want to tie it around your head!.

Once you get the hang of this why not experiment. This one has daisies and butterflies.

As usual with any of my patterns I would be very grateful if you tell me about mistakes and we are very happy to help - so please get in touch.
I once was seen wandering with flowers in my hair and bells round my neck, with floaty frocks and bare feet. It is very hard to imagine those days now but these chains go part way to taking me back to my youth!
Lynn

My way of making Dorset buttons - Step by Step instructions.

$
0
0
Vicky tells me that Dorset buttons are being talked about at the moment so I thought I would show you my method of making them. Be warned I have only ever seen the buttons from a distance so there is probably a much better way of making them.

These are the results.

 Top ones are made using stranded embroidery thread. The rest using 4ply variegated wool.
This is what the back looks like - my mum would be proud of me she always said the back should be as neat  as the front. You can see that I have experimented with loops to attach the buttons with.
I decided that the buttons could be attached more neatly be sewing them directly to the garment so I have packaged them with a piece of yarn for the purpose.
 These are the base of the buttons. The green and brown rings are about 2cm in diameter and came from old costume jewelry. The black one again 2cm in diameter used for mending bras and can be bought on line.
The white one is a roman blind ring about 3.5cm wide and I bought these in a local hardware shop but you can buy them on line.


The yarn used here is double knitting cotton.
Join yarn to the ring and then work dc into ring. The ring should be quite densely covered and the number of double crochets should be and even number times 6. I used 36 for this one (6 x 6) but for the smaller ones I use 24 (4 x 6). Notice that at the end I have only pulled the yarn through the last stitch. This means you can needle join the gap which is much tidier.


 Using a blunt sewing needle and a long piece of thread. Join the yarn you are going to use for the spokes by running it under some of the dcs. on the back of the button.
 Count half of your stitches in my case 18 and insert the needle between the 18th and 19th stitch ( or whatever half of your number is). try to make sure it comes out between two threads on the right side.
 Take the thread down the front of the button and push it through to the back. So now you have two threads one down the front and one down the back.
 This is the tricky bit as it involves sums! For this one I counted 6 stitches ( to the right of the first spoke) and ran the thread under them as the picture shows. The number of stitches you count depends on how many times 6 you did at the start. example: if you made 48 stitches ( 6 x 8 ) you should count 8 - you get the idea. Count 6 stitches to the left of the bottom of the first spoke and insert your needle.  This forms a cross
 Like this.
  Now push the needle to the back of the button to make a second spoke.
 Repeat the process once more to make the last spoke.
 Do not break the thread but take it to the middle and make a few stitches to hold the centre of the wheel in place.
 Then working in a spiral and from the front of the button, bring the yarn out between two spokes, push the needle through the next gap to the right as shown in the next picture.
 Then bring it up to the left of the next spoke along in an anticlockwise direction.Now put your needle through the gap to the right of this spoke etc. Effectively what you are doing is wrapping the yarn around each spoke in turn, working around the next spoke to the left each time.
 Keep doing this until you run out of room. Fasten off and sit back and admire your finished work of art.
 There are lots of things you can do to change the character of your buttons:
Use different thickness rings or yarn. Do 8 spokes ( you do the maths.), don't quite fill in the centre. You can slide the contrast colour  used for the centre under the dcs so you get a plain outer ring etc. Anyway experiment and please let me see any that you make.

As I have said before I am an ex teacher so I tend to write instructions as  if to a class of children - this may result in me sounding patronising (sorry if it does). Then I think of this and start writing very briefly so you may not understand what I am talking about. Let me know what I should do to improve - constructive criticism only please.
Lynn

Decorate your garden with crochet?

$
0
0
I was trying to think of fathers day ideas when I remembered Vicky's idea to make decorations for the garden so:

 The Row markers for pot plants or the allotment maybe have changed a bit? Daisy, butterfly, cabbage, carrot pea pods and a bee. I am particularly pleased with the little pea pods with tiny peas.


I had made these rather gruesome spiders already..........


........ and I had been talking about Dorset buttons. This is a combination of the two. I found a much bigger ring and used the same ideas as in the previous post, to make a web.


Very slight adjustments to the spider body and the addition of wings makes these jewels of the garden.


This is my favourite. Somehow the eyes are just right.


We have got lots of other garden ideas which I have already shared - such as bees and dragon flies.
I am now going to make some bunting with flowers like this: Pattern here


It is for those of you ( like me who) have a less than green finger. You can tie it to flowerless plants and make them look pretty.
But if you get really desperate how about this?


Lynn

Garden Crochet

$
0
0
Yesterday mum touched on my new campaign to take crochet into the outdoors.  I love yarn-bombing/yarn-storming when it is done well and I think there's a real place for lovely yarny things brightening our gardens.

Mum blogged about some of the things she is making at the moment in the last post.  I recommend going back and looking at her pictures ... but not 'til you've finished here of course! :)

So, let me introduce you to our outdoorsy crochet.  Some from the past and some currently for sale as patterns or finished objects.

Little hanging baskets made from bright t-shirt yarn hanging on a trellis.  I filled them with strawberry and tomato plants.  Can you see the two little crochet bird friends keeping watch?

Flower pot covers.
 Again in T-Shirt yarn.  Mum turned some of these into bigger hanging baskets.


Pretty, aren't they?  Particularly if you match your pot colour with your flowers.  They make a real feature.
T shirt yarn is so lovely and stretchy and versatile.  The bright colours really cheer up the garden corners that belong to children. My boys have a giant t shirt yarn crochet net to keep their foot balls in. It is like an enormous crochet shopping bag that hangs on the fence in the back garden. Dead quick to make - less than an hour with a giant hook.  I must write up the pattern to share.  If you have children you need one!

These are my favourites!  We sell loads of them every year in many different colours.

Tiny (although bigger than life-size) woolly bumble bees. With shiny stingers and antennae.
 
I don't know if you can see clearly but I have a whole swarm in the bush in my front garden.  We sell the bees and the pattern in our Etsy shop.

If you're really brave ... what about a nest of spiders crawling on your decking?  
It is my ambition to fill my front garden with little animals.  I'd like chickens on the lawn, a cat by the door, crochet hanging baskets full of crochet flowers, slugs and snails and frogs and hedgehogs and ... everything!  My only problem is that things don't last long in the English weather.  They go soggy and colours fade.  I need to find a good way of water-proofing.  I've a feeling this project may take me a while.

Victoria x

CE Testing Crochet Toys

$
0
0
If you were to see an old woman weighing bean cans and torturing small crochet creatures in her kitchen, I expect you might suggest she needs medical help. In fact this is just to comply with the safety of toys laws. Don't get me wrong I thoroughly approve of making sure toys are not a threat to children's well being and we always have tried to make the things we make very safe. You can probably feel the but coming: we also believe in upcycling and recycling and we usually only make limited numbers (sometimes only one) of each toy. This it seems is no longer possible. The rules have been made for large manufacturers of toys and we small artisan makers must try to comply.

I have tried to get round the problem of limited numbers of each toy by making a generic toy for testing:


 He has a limb, an ear, some hair, all the different eyes we might use and each side of him is made to a different tension.


Now assemble your torture kit - not shown is a bag full of bean cans and sugar bags weighing in total 9.2 kg
This is me testing a seam.
And when you have tried to stretch him on the rack you have to try and shove a wooden spoon into him . The scales should read 1kg but it is quite hard to do this yourself as well as take the picture. Anyway he has passed all of the tests so far - hooray.


Having said that we rarely make many toys of the same kind there are one or two exceptions so I had the terrible task of selecting one of these dear little mice for the torture chamber. These are one of our best sellers.


Here I am checking that the beads used for his nose and eyes don't come off - they didn't but his tail needs a better way of anchoring it.
He is being very brave!


Here I am trying to pull the hair out of a minion. The fact that he is an evil minion doesn't make me feel any better!

The first lot of tests are done and mostly things have gone well but I am dreading tomorrow when I have to start the flamability tests so I am going to be setting fire to mice - good grief!

The final test for all of these is the chemical migration of dyes test on the yarn and I really don't think it is even possible to find out about this for the vintage yarns we have used.

On a lighter note I wonder if I can sue the government for the damage I have done to my back doing the tension test?


More Garden Crochet for the Flower People.

$
0
0
Next show/fair is in just over a week so all my crochet has been in preparation. But it is still for gardens

Spare buttons glued on to wooden row marker sticks Not really crochet but pretty.
 All of the flower pot covers and markers. -so far!
All made using dk. cotton of various makes but any double knitting will do.
Notice how the markers have been made to go with the pot cover. Pot covers are all washable and re-usable.
The trouble is I do these as I go along and so I don't know how to make another one the same, which is a shame because I really like the 3D effect of the one on the left.  But if you just experiment and make a tube that fits around the bottom of the pot, the naturals stretch in crochet will allow your cover to fit.
Is it possible to have too many flowers?
The colour combination of this one has worked out well. Another happy accident.


 This is another set of coasters using the free pattern from a previous blog - still trying to take interesting photographs. Notice that if you make rows 3,5 and 6 one colour and row 4 a different colour you get a row of what looks like hearts!
You can use the coasters in the garden as Vicky said - ideal for your pimms.
Finally a pair of neck purses for people going to festivals. They will need a safe place to store their beer money.
I can' really wangle it so that these are for the garden -I suppose you could keep seeds or string or something in it if you are a gardener.


I am off to make a bowl of strawberries and some bunting (crochet ones of course) - it's the time of the year you know!
Lynn

The garden is a happy (hippy) place.

$
0
0
We have been talking about crochet for the garden well here is another idea?

 Something about bunting makes me happy. Perhaps it is its association with celebration. Here is some of the bunting that Vicky and I have made. It is strung between a jasmin and a wooden fence. It is a bright and scented place to sit but it has shade if you are too hot. What more could you want?


Here are some close ups                                                                                          


It even looks good in a heap, somehow full of promise? 


I went off to make a bowl of strawberries at the end of the last post - well I did but I think you might need a pretty big bowl.

The bowl on the left has real strawberries in it, you can see that I got the scale a bit wrong. Never mind I have made them into key rings or bag charms. You will certainly never lose your keys again if they are attached to one of these.

 Strawberries make you think Wimbledon (or maybe cream) so I tried a tennis racquet. As you can see not everything  is successful, one hit and the handle ended at 90 degrees to the face! I used to play with one like this and it weighed a ton.


This is today's cliff hanger a pretty hippy type head band with flowers and bells. The question is what has it got to do with a tile spacer bought at B and Q? All will be revealed in the next exciting episode.
Lynn

Inspiration B and Q and Free Braid Instructions

$
0
0
Last time I promised to tell you about tile spacers because I knew how interested you would be!!!Well it wasn't true because the thing I used was a plastic packer for jamming doors and windows in place.
There are three different colours which represent three different thicknesses. I have found them easier to use  for braid making if the prongs are shorter so the red ones I cut with scissors, the green ones I cut with a bread saw and I suspect I will need a hack saw for the black ones. I then filed the rough bits off and used a flame to melt/smooth the finished product.

We have long been searching for something to make small pom-poms with and when I saw these in B and Q who could resist ( 30 in a packet for less than £1.50). Then Mrs creativity or Vicky as I sometimes call her got hold of one and the rest is history. She worked out how to use them to make pretty braids much in the same way you would use your loom bands and then I spent some time developing her idea. First attempt too ambitious so a bit messy.

 The thing I keep forgetting is to leave a very long end at the start as this will form one of the ties.
It is easier when you start to use super chunky yarn, which gives a neater finish.


 The one below is Dk and it took all my concentration
to keep the colours in the right order.
I went to sports day yesterday and many of the older girls were wearing flowers in their hair so I have started this braid. It is not finished yet but I hope it gives a flavour of what is possible.


BRAID MAKING INSTRUCTIONS

1.  Make a slip knot loop and put it on the left hand prong.

2.  Wind the yarn around the right hand prong, going through the gap around the front and then back through the gap.

3. Now wrap the yarn around the LH. prong, going around the front first, then around the back and back through the gap towards you.

4. Repeat 2 and 3 until you have three loops on each prong ( this time you also count the slip knot as a loop).

5. Use the hook to lift the bottom loop on the LH prong over the top of the other two loops. It is quite difficult to do this as you have to stop the other loops sliding off and hold the end of the yarn as well.

6. Now take the bottom loop on the RH prong over the top of the other two loops.

7.  Your work should now look like this.

8.  Wrap the yarn as before but first around the LH prong and then the RH prong to get back to three loops on each and now do 5 and 6 again.

9.  Just keep doing numbers 5 to 8 over and over again until your braid is as long as you want it.

10. To finish off when your work looks like number 7 don’t do any more wrapping, just lift the bottom loop over the top one on each prong so that you now only have one loop on each. Then put all the loops on one prong and lift the bottom one over the top one.  Slide the final loop off the prong, cut the yarn and then put it through the loop and pull tight.

NOTE: to make it easier you can do all of this with only two loops on each prong and just lift the bottom loop over the top loop each time.
When you get really clever you can make braids with three different colours or add some beads – use your creativity and imagination and have fun.
You can also use the prongy thing to make tiddly pom-poms!
Finally we are at the Hurst country Fair this weekend so come along and say hello. You can also try your hand at making braids, pom-poms or making a finger knitted bangle, so hope to see you there.
Lynn

Hurst Country Fair: wet/dry, happy/sad and Unicorns

$
0
0
The country Fair at Hurst was very interesting. Saturday was very miserable it rained most of the day and when it wasn't raining it was absolutely pouring. We spent most of the day covering and uncovering the crochet to stop it getting wet. Sunday was a beautiful day, no rain mostly glorious sun and lots of people. So why did we take more or less the same amount on each day I wonder?

If you look carefully you can see the rain on the roof and the drips around the edges of the gazebo.

Probably our best selling items were these key rings.

Sadly we only sold one of the pot plants but don't they look pretty set up like this?

Our stall was right opposite the arena so at one point during the day we looked through the rain only to see princesses on unicorns which were dancing to the music - honestly!


Hurst is a small village but the show was extremely well organised, with gazebos already erected when we got there and people to help with traffic management etc.  My favourite part was the dog racing: just any old dogs chasing a ball in the direction of the finishing line -very funny. Or was it the hobby horse racing?  I am very glad to say dobbin found a new and loving home after having been loved by Ben and Danny for quite some time.


Saddest story of the day a little girl fell in love with purple bear and her grandma bought it for her but they came back later because she had lost it. I said I would make her a new one but sadly I can't find any more yarn like this. So two things; if you know the whereabouts of the bear then please let us know - anonymity guaranteed. Or if you know a source of 4ply variegated purple yarn- PLEASE PLEASE get in touch.
Thank you.
Lynn

P.S. in search of yarn, today we went to Hobby Craft -didn't find the yarn I wanted but found lots I didn't know I wanted. But I did find CE marked stuffing so with all the help we have received from the CE group and the stuffing we can now CE mark all our toys. Hooray!
Lynn

Applique, Christmas Kits and Anonymous

$
0
0
I don't seem to have had much time for actual crochet this week. Graham and I have been going to pick up things bought on ebay and when we do we make a point of looking for something to see in the area. Went to Crawley and found Tilford Park - highly recommended.
I have also been inspired by a very old Stitch craft magazine and seeing Vicky cover holes in her favouite jumper using crochet patches. The result of the inspiration is this.


This is an old pashmina with a dirty mark on it. A few crocheted leaves make a good cover for the stain. I have another one like this that has a crosswise pull that looks a bit like a ladder in a stocking (yes I am that old ) and I am attempting a similar fix - will share when finished. I sewed the leaves on with very small stitches using a fine needle and cotton so that the stitching does not show on the other side.


 These are the prototypes of our new Christmas kits. We have three different Christmas key rings planned, they will be available in kit form and will include all the findings and yarn together with a pattern. A nice small gift and always better if you make it yourself
I am planning to change the colour of the star shown here because I don't like the gold with the silver key ring. I will also change the colour of the tiny jingle bells

Lastly here is our logo without the basket and with his feet made bigger and turned round. He is lovely but still nameless although Vicky suggested Woolfred or Wooliam. The best I can do at the moment is Crochetpher -any suggestions?
Lynn


5 Reasons to Take This Crochet Health Survey

$
0
0

This is a guest post from Kathryn Vercillo, author of Crochet Saved My Life and blogger at Crochet Concupiscence. She’s running a crochet health surveyright now and wants you to know why it would be great if you could take a moment to participate.


Crochet saved my life. Literally. In my late twenties I was stuck in a downward spiral of chronic depression and had a really difficult time pulling myself out. It was during that time that I discovered crochet, a craft that could soothe my mind, reduce my anxiety, rebuild my self-esteem and bring joy back into my life. I began to crochet daily, and I began to heal. Later, I started to share my story on my blog and the comments I received made it obvious that there were many other people also healing from crochet. That’s when I started the research for my book, Crochet Saved My Life, because I wanted to find out just how this craft was helping people. The new survey that I’ve created is a continuation of that research, taking it further, and I’m hoping that you’ll participate.


Here are five reasons that it is beneficial for people to participate in this crochet health survey:

1.      Learn more about how crochet has helped you. By taking a few moments to answer the questions in this survey, you just might gain fresh insight into how the craft is helping you. It’s a great feeling to realize that they hobby you love is really a vital part of your life.
2.      Help others understand the health benefits of crochet. As the word spreads, more and more people are picking up crochet hooks to help themselves. When you share your information, it helps others realize how the craft can help them.
3.      Increase credibility for the craft as a form of therapy. This is an intensive, serious study that will be promoted to institutions, doctors and other researchers to help get support for crochet in a variety of healing settings.
4.      Support an indie author. I do all of my own writing, research and publishing. I can’t do it without the contributions of people who are willing to share their stories and information. The more I learn about how crochet helps other, the more I can share that information.
5.      Celebrate crochet! Above and beyond anything else, this survey celebrates the craft of crochet. It looks at what it can do to help people, not only with health issues but with improving general quality of life.


You can take the survey now or learn more about it from this press release


Crochet kits, hats and PYO

$
0
0
Vicky and I are in head exploding mode!! We have never done a big show before - two days of Fibre East, we have no idea how much stock we will need or what we will need when we get there to be able to set up, so we go from nervous break down ( not enough stock ) to excitement ( everybody buys everything and we become very rich)!
As you can imagine not much time for crochet but there is a bit to share.


 You may remember these mice. We are going to try and sell the kit to make them but we had sold all our examples at the Hurst Show so I decided to make a few more. They are so cute that I decided to share all of the pictures.


In the kit you get 5 balls of yarn - here is a selection but there are lots of other colours.
This is the content: stuffing, pattern, yarn. hook. yarn needle, stitch marker, and beads.


Once you think of a good idea ( in this case kits ) it is difficult to stop so I completed the Christmas Key ring Kit that I mentioned last time.

Key rings defying gravity , interesting effect
 Classic photography mistake, if you look carefully you can see me taking the picture.
 These are tinkling, twinkling stars. As I suspected the white ones are better than the gold ones but this is not obvious from the picture.


This is what the kit looks like. I forgot to list the pattern on the front but it is included.


 A beany type hat made by Vicky from one of our Yarn Candy tubes ( you could make three like this from one tube) . I like the effect of the fringe made from the ends of yarn.

I am off to see what else you can make from one tube. I may not last long because this morning we went fruit picking and we drove home with the raspberries on my lap - who can resist sun warmed fruit? I hope my digestion is up to it!
Lynn


The Yarn Truffle Crochet or Knitting Challenge

$
0
0
Once again inspired by Vicky I set out to show people what could be made from one of these:

A bag of Yarn Truffles. 50g of colour themed yarn!
This is the contents of the bag shown but each bag is slightly different and this is not the bag I used.


We have a box of these ready, so to make it a fair challenge I just put my hand in the box and pulled a bag out without looking.

This shows all the things that I have made from one bag of yarn. Four large brooches, a big purse and a little purse, three hair clips, a beaded bracelet and a tie on thing that could be a necklace or a head band or you could tie it on to any other bit of you, you fancy.


Of course these makes needed some extra bits so I raided the haberdashery and embellishments. I didn't use the whole packet of the beads, buttons, bells , hair clips or brooch backs so I will be able to do this all again with the remainder.


The rest of the pictures are mainly close ups of the things that you can make.

The jungle brooch/pin
 The garden brooch
 The coral reef brooch
The solar system brooch


I have made a sort of pattern for these three.  They only use three very simple motifs - a circle, a flower and a coral. You can probably see that I have cheated and used a few orange beads.


It has been  really interesting to work out how to use the yarn to the best effect - if you fancy the same challenge the bags of yarn truffles are for sale as are the packets of haberdashery and embellishments of haberdashery.


The really annoying thing is that I had this much yarn left .
As I was writing the title I thought I was being crochetist by excluding the knitters. So if you knit why not try the great yarn truffle challenge - what can you make????

Persephone the Pig and Red Riding Hood

$
0
0
Only two days to Fibre East so I havn't really got time for this but I couldn't resist. First this is a lovely pattern designed by Vicky so I thought it would be a good idea to have an example so people could see what they could make with the pattern.


 But having made this one I thought we are trying to sell tubes of yarn like these:
So here is what you can make if you combine the pattern
with the yarn tube!


It is a good job that I did do this because I have just noticed that I havn't given him a mouth imagine a pig that can't eat!
He took less than half a tube of Yarn Candy so you could make two from one tube - bargain I say.


The point of what we are doing is to encourage and demonstrate free-form crochet so here is a reminder of what is possible when an artist gets really proficient at crochet.(I should say that the photograph doesn't quite do justice to the colours)


Vicky did this with a plan to make more fairy tales - sadly she has not had time yet to make more.
Can you spot the big bad wolf?
Wish us luck for this weekend
Lynn

Fibre East Successes and Lessons Learned

$
0
0
We are both still recovering from our first big show. We learned lessons, made some money and above all met lovely people who shared our passion for crochet and yarn.


This is the set up - it wasn't long before we realised that we needed to display the yarn tubes in a different way for various reasons - they weren't in the right place and when people tried to rummage the cages fell apart, so we won't be taking them again!


This is patterns and haberdashery which also wasn't quite right but the lovely lady behind did really well with her baskets.

Buttons, beads, hooks and needles - all of these sold very well.


We did get some things right; Cecily the stripping sheep was sold very quickly although we did keep her until the end so that we could demonstrate what could be made from the pattern. The free-form examples that we took  with us were also very popular and we received lots of compliments.


Most admired was the Red Riding hood work which people seemed to think should be in an exhibition and I agree - it is amazing.
There were many people who said they couldn't do free-form because they were nervous of trying anything without a pattern; Vicky had anticipated this by making a guided free-form pattern for beginners. The book cover bottom right of this picture is made from the pattern.


This is a piece that was started for us to demonstrate free-form at the show. So the way it worked was Vicky did Red Riding Hood, I had done the Rainbow scarf and we both worked on this piece through the two days. I think it has worked ( or is working) very well. The only problem is that the most frequent question was 'what is it going to be'? I can't decide whether to carry on and make a throw, or should it be a cushion or a bag or perhaps a warm winter coat?

Lynn

Ahem!  I think you forgot the most amazing part of the weekend ... my successful completion of a 100 wrap bullion stitch. Not a very useful size for a bullion but a crochet triumph ;-)

Victoria x


Free Christmas gift for all our crochet friends - you can do bullions

$
0
0
Summer show over so start thinking about Christmas and some new things to add to the old favourites. Before that here is an early Christmas present.  We were asked so often how to do a bullion easily I thought I'd share my favourite method.


Bullions are an integral part of free-form and yet until recently I had avoided them because they were so difficult but then I discovered the drinking straw method and it is now almost as easy as a treble. Thank you bethintx1 - there is a video here showing this method.


1. cut a piece of drinking straw about the length of the shaft of the hook


2. cut along the length of the straw.


3. cut the corners off  and place the straw around the hook when you are ready to make bullions.


4. I am making a circle of bullions so I have made a magic circle and a chain about the length of the bullion I want to make.


5. make sure that the current stitch is around the straw and then wrap as many turns as you need around the straw - the picture shows 6 wraps


 6. put the hook into the ring, yarn over hook and pull a loop through, make sure that this loop is on the straw as well.
 7. yarn over hook and pull this loop through the centre of the straw.  You can use the slit in the straw to guide the 'nose' of your hook if need be.
8. Remove the straw and your bullion is complete.


Vicky managed to use a whole straw and a tunisian crochet hook to make a 100 wrap bullion. I think this must be a world record unless you know different.

TIP I have found that the straws from Macdonald's work the best - so here is a perfect excuse for some quick take away food.
Lynn

First Christmas Ideas and a flash of genius

$
0
0
We really have started to think about Christmas and I wanted to do something a bit different so I raided the loft and actually found the Christmas decorations ( this is a miracle if you know my loft) and since then I have been trying to crochet around the ordinary plastic shiny baubles.


Isn't it pleasing to see baubles among osteospernum and passion flowers to say nothing of in the beach pebbles.

I will try to write a pattern for these soon.


The flash of genius? I ran out of baubles and
 I couldn't face the loft again so I decided to make a granny square
advent calendar. The backing is made from super chunky yarn and it if fixed to a trouser hanger. I made the 24 granny squares first and then made the back fit. Each square has a fairly stiff felt lining which I sewed in place before attaching the squares to the backing.
As you can see I started to fill each little pocket with tiny little crochet things. I am particularly pleased with the jolly (drunk?) pixie. The angel has a mad miss Haversham look and somehow Santa seems hunched, cold and fed up. The others are a tiny tortoise, a miniscule owl, a small mouse and a fish.
Anyway then I had my flash of genius: why not make it an Advent calendar or Christmas present for crafters? You could fill each pocket with something essential or luxurious for a particular craft such as a packet of sewing needles, some special buttons a ball of yarn. Or you could put in a mix of things like the ones I am going to use;


And here they are in close up:
 3 large jingle bells and a ball of sparkly yarn
 Three different types of thread.
 Buttons and hooks
More buttons and a key ring finding
 Safety eyes  and some hair clip blanks
 a tape measure and a tiny purse clip
 A set of cat buttons and a set of snowman buttons.


Some small silver jingle bells and some stitch holders
 More buttons and some tassels
Brooch findings and hair combs


Some beads and some ribbon.


I know advent calendars should have numbers and I am still thinking about them - either felt cut with the dye cutter or I have some number beads coming. I am amazed that there are exactly 24 different things here although some might say there are rather too many buttons - but I don't think that that is possible.
Lynn

Circles Mandalas and Dream Catchers.

$
0
0


As you can see, this week I have been going round in circles. I have been looking at some of the beautiful mandalas that have been submitted for show at YarnDale. They are amazing and inspiring so I had to have a go. The other thing that I had been dying to try was overlay crochet .
The results of putting the two ideas together are here. All done in Rico essentials double knitting cotton.


I am pleased with the results although the colour schemes were dictated by what was already in my stash. Perfect excuse to buy more yarn (as if I needed one)

While I was rummaging for cotton I found an old pattern for a doily which I have converted (by way of the two copper rings from an old lamp shade ) into a pair of dream catchers. These are the perfect excuse to use up ribbons and beads (and anything else) from your stash.

This one is not finished yet but it is made using some rainbow ribbon yarn equivalent to about 4ply I should think.


Lastly Graham and I went to Farnham yesterday to check if the castle was suitable to take Ben and Danny to. It was very good with some quite hair raising views through glass panels to the ground. While we were there we discovered The University of the Creative Arts has a Craft Study Centre which is open to the public. I can really recommend a visit.
Viewing all 226 articles
Browse latest View live