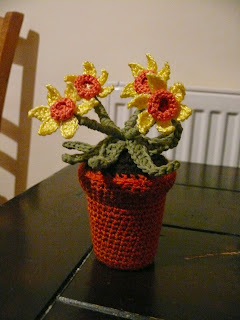
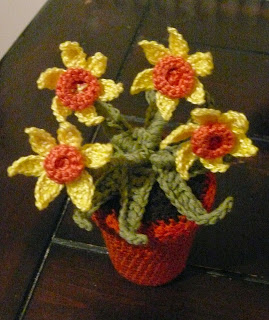
Sometimes I try to help Vicky with her commissions. So as somebody has asked for a pot of flowers I thought I would share the secrets of making the flower pot itself while I help Vicky. These are what the customer saw but they were already sold.
![]()
![]()
1.Inside any cone of wool there is a really useful cardboard cone.
![]()
![]()
![]()
![]()
![]()
![]()
![]()
![]()
![]()
Once you master this technique of trying your crochet onto the pot and then either increasing or decreasing the number of stitches, you can cover anything - try those plastic peanut butter jars add decoration and you have some really handy screw top containers for all those annoying bits of K'nex or lego or for buttons.
1.Inside any cone of wool there is a really useful cardboard cone.

2. Measure up from the wide end about 9cm or however long you want your pot to be and then using a bread knife ( but don't tell Graham ) saw the section off.


3. Stand the smaller end on some card and draw around it. Then cut about 2cm away from the circle. Now cut V shapes in the extra 2cm of card with the point of the v just inside your drawn line.

4. Starting from the wide end of your tube push the card into and right to the bottom of the pot to be. You may need to fold the flaps first.


4. At this point you need to weight the pot so that it does not tip when you add your beautiful flowers. I have used plasticine or plaster of paris (from e-bay) or even some stones. The plaster of paris seems to work best. I make a fairly thick paste and put it in the bottom of the tube to a depth of about 1cm.
 |
| plaster of paris and a few stones. |
5. The pot is now ready to crochet round. So make a flat circle ( I used terracotta coloured, chunky yarn because I am a traditionalist but anything will do ).
i. magic circle and work 1ch (does not count as a stitch) 8dc in it. ss into first dc.
ii 1ch and then 2dc in each stitch around (16 stitches )
ii 1ch , 1dc in same place 2dc in next stitch, ( 1dc in next stitch 2dc in next stitch ) x 7 (24 stitches)
iii 1ch , 1dc, in same place 1dc, 2dc in next stitch, ( 1dc in next 2 stitches 2dc in next stitch ) x 7 (32 stitches)
Keep going, in this pattern until the circle is the same size as your pot base. You should increase the numbers highlighted in pink by one each round and the number of stitches should increase by 8 in each round. Don't worry if it doesn't fit exactly but better a bit too small than a bit too big.

Now work in a spiral (amigurumi style)
first round using back loops only 1dc in each stitch do not join.
Use both loops from here on
Second round 1dc in each stitch
third round increase one stitch at the start of the round and one half way round ( do this by working 2 dc into your chosen stitch)
From here until you reach the top the best advice I can offer is to keep trying your work on the pot and if it feels a bit tight then increase in the next round. Otherwise just keep working straight. The stretchy nature of crochet means that it will fit the pot snugly without too much in the way of increasing.

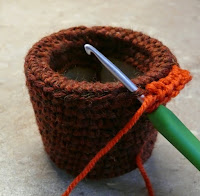
When the work reaches the top of the pot work one round in the back loops only and then a couple more rows that will tuck inside the pot later.Cut and fasten off.
 |
| here the extra has been tucked into the pot. |
Lastly if you want a realistic looking pot you can work 3 rows of htr (in front loop only) in the unused loops at the top of the pot where you worked in the back loops only the front loops are free. This will then fold outwards to make the rim. I have used orange to make the extra bit clear.
 |
| this shows how the pot rim is attached |
 |
| completed pot |
Once you master this technique of trying your crochet onto the pot and then either increasing or decreasing the number of stitches, you can cover anything - try those plastic peanut butter jars add decoration and you have some really handy screw top containers for all those annoying bits of K'nex or lego or for buttons.
 |
| example of covered pots from the past. |
Don't miss the next exciting episode - adding earth and flowers.


